Pages

Showing posts with label DIY. Show all posts

Thursday, January 19, 2012

DIY Tshirt scarf

This is a tutorial for a DIY Tshirt scarf.
First, find an old Tshirt either of yours or your significant other.  In my opinion, the larger the better as it will make a longer scarf and you will be able to tie it easily around your neck (if you choose).  I apologize for the picture here, but this Tshirt is actually a black Tshirt that I stole from hubby's closet.  Shhhh...nobody tell him ok?  Ok, good. 
I forgot to take a picture of the next stop, but take an ordinary paper plate (you can use anything circular, but I liked the size of a paper plate), place it face down on the shirt, and trace circles all over the Tshirt until you run out of material.  Mine made about 8 and the Tshirt was an XL.  Oh-and this works best if the shirt does not have seams down the side(s) as you will get more circles from the shirt.
The next two steps may take a while until you get a rythm down, but bare with me....
Cut all the circles out and then start cutting each circle into a spiral.  As you can see below, I cut strips about 1/2 wide (maybe 3/4 inch).  I hope that last part makes sense since I didn't get to video the process. 
After all the sprial strips are cut, lay two peices end to end and use fabric glue to secure the two peices together.  Let dry.  Again, forgot to take a picture of the next step, but I just got a small strip from the same shirt and tied it around the middle section, knoting it to secure.  This will make one long scarf. 
Here is a (horrible) self portrait of the scarf.  I love this scarf and get compliments on it all the time!  I even made my daughter a white one from a childs' size large Tshirt. 
**And because I became so addicted to these Tshirt scarves, I went to my local thrift store and found several different colors and sizes and the best part is they were all $1 each! 


Thanks for stopping in!

Monday, May 10, 2010

DIY Thrifty Treasure, candle remake

I am linking to The DIY Showoff and Rhoda's Today's Thrifty Treasures.  Please check out both parties to see many more great ideas!

I am probably the last person to work with these candles, but when I took a trip to my local Kmart recently, I found these on clearance for $1 each.  The place mat came from Publix and was $1.19.  You first saw these two finds in this post last week. 
Please excuse the fact that I didn't take 'during' pictures, but here are the final products.
I cut the burlap place mat to fit one of the larger candles.  I wasn't sure how much I would get out of it, but surprisingly enough I ended up doing both tall ones and a small Dollar Tree candle I had sitting on my kitchen counter.  A good example how nothing is safe around my house!  After I clued the burlap on all three, I got out my embellishments and just came up with something, deciding on black (and white) ribbon on two of them, and aqua beads on the third one.  I love how they turned out.
Thanks for stopping in and please leave me a comment. 

Thursday, August 13, 2009

DIY Thursday

I am joining Kimba's DIY Thursday link party.
Stop on over there and check out other great ideas!

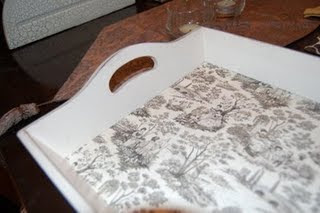
I forgot to take a picture of the tray before, but it was painted a lighter shade and you can see the blue design in the middle. I just didn't go with the rest of my decor, so I decided to change it up.
I sprayed it with Heirloom white, sanded the edges and then wiped stain on the sanded part to give it a distressed look.

I used scrapbook paper to line the inside. Yes, it took forever to match up the pattern but I did it. And glued it down with stick glue!

And here it is in my dining room (on my buffet) just ready for some dessert!


Thanks for stopping in---feel free to leave me your comments, as I love them!